
Filming hands-only DIY videos: 5 camera angles, lighting and backdrop
How the FoxBench DIY bench is set up to film builds with only hands in frame: five camera angles, GoPro and iPhone settings, two lights and a blue backdrop.
Published
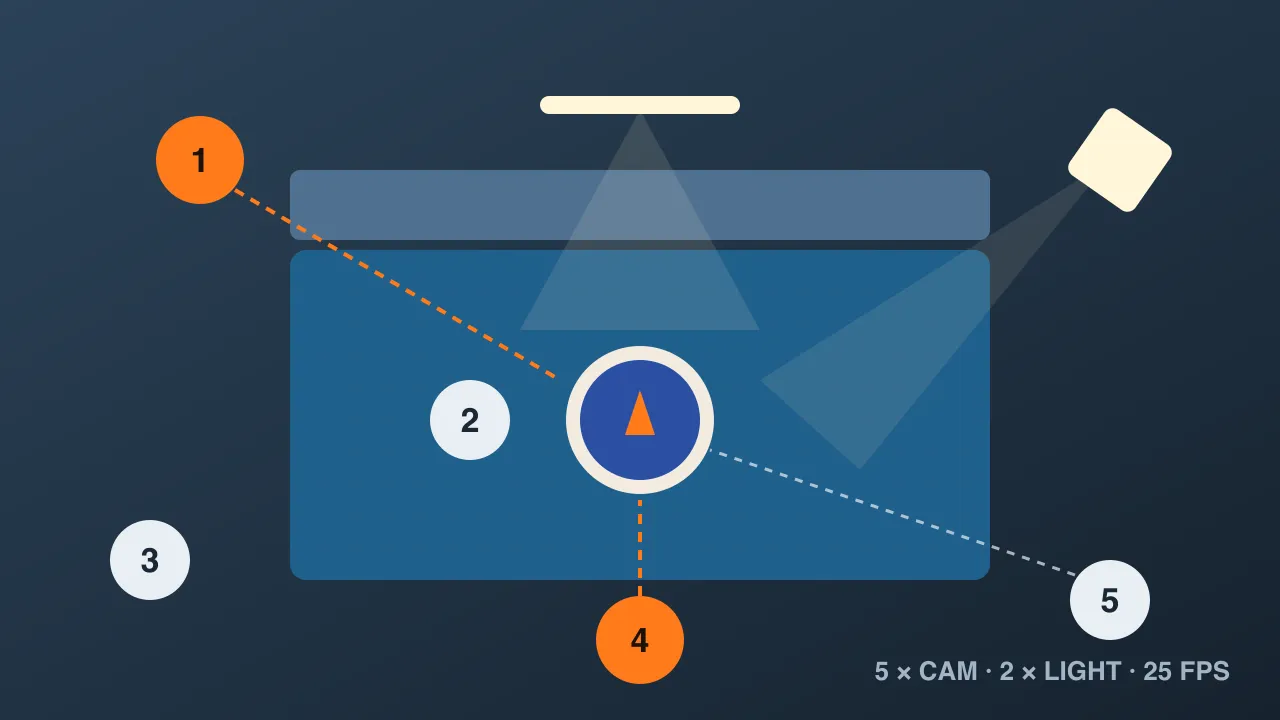
FoxBench DIY videos have no narration and no faces: just hands, real workshop sound and on-screen text. That style lives or dies on the picture, so where you put the cameras and lights matters more than an expensive camera. This post documents the current bench setup, in case you want to film your own builds.
Three kinds of shots
Every video is cut from three kinds of shots:
- CAD screen at the start, 20–40 seconds: the model spinning and exploding into parts.
- Hands at work: a camera at 35–45° looking down at the work area. This is the bulk of the video.
- Product and assembly on a seamless blue backdrop: low camera, 3/4 angle, soft light.
Cameras and settings
The bench uses three cameras: a GoPro Hero 7 Black for hands-on shots and printer timelapses, an iPhone 11 Pro Max for product shots, and a second phone as a wide backup. The key rule: every camera shoots 25fps (mains power here is 50Hz), so clips cut together cleanly and lights do not flicker.
| Setting | GoPro (hands) | iPhone (product) |
|---|---|---|
| Resolution | 4K or 2.7K, 25fps | 4K 25fps |
| Lens | Linear (no fisheye) | 2x tele, 40–60cm from the subject |
| Anti-flicker | 50Hz | 1/50 shutter (manual camera app) |
| White balance | Locked around 5500K | Locked 5000–5600K |
| ISO | 100–400 | As low as the light allows |
| Exposure comp. | EV −0.5 | −0.3 to −0.7 after locking |
Never leave it on auto. Lock white balance, focus and exposure on every camera before recording. On auto, color and brightness “breathe” every time a hand crosses the frame.
Five camera angles
| Angle | Camera | Placement | Used for |
|---|---|---|---|
| 1. Down at the hands (~60% of the video) | GoPro | Magic arm clamped to the shelf post, 35–45° | Cutting, drilling, soldering, assembly |
| 2. Straight top-down | iPhone or GoPro | Hung from the shelf beam or a long arm | Wiring, soldering boards, laying out parts |
| 3. 3D printer | GoPro | Lower shelf, timelapse mode | Print timelapses |
| 4. Product close-up | iPhone 2x tele | Tripod 10–20cm above the desk, 3/4 angle | Details, assembly on the backdrop |
| 5. Test run | iPhone or backup phone | Wide, whole machine in frame | The machine running |
Each product shot gets 10–15 seconds locked off plus a few very slow camera slides. For angles 4 and 5, leave room above and below so the shot can be cropped to 9:16 for Shorts without losing the product.
Lighting: two lights, one color
Good light matters more than camera settings. The setup uses two lights at the same color temperature, with ceiling lights and any other colored lights switched off:
- LED bar overhead: magnetic, stuck to the shelf beam and pointing straight down at the work area. Neutral white mode, 100% brightness and plugged in (cheap lights often flicker at low brightness or low battery).
- Panel light at 45°: the bigger, the softer. Look for CRI 90 or above and adjustable color temperature to match the overhead light.
Two things to avoid:
- Ring lights reflect as a visible ring on glossy plastic in close-ups.
- Mixing warm and white lights: skin and plastic end up different colors and grading becomes painful.
Match colors across cameras: shoot a sheet of white paper under the lights and adjust each camera’s white balance until the paper is neither yellow nor blue.
Flicker test: film the lit area in slow motion on a phone at a few brightness levels. Dark bands rolling across the screen mean the light flickers, so swap it.
Bench and backdrop
- A blue cutting mat pushed to the front edge of the desk, with about 10cm free at the back. When using a soldering iron, glue gun or hot parts, add a silicone heat mat on top.
- A matte blue PVC backdrop, at least 60×120cm, slightly grey-blue. Clip the top edge to the shelf beam and let the bottom curve naturally onto the desk so there is no visible fold. Roll it backwards overnight to flatten it.
- For product shots remove the cutting mat and keep only the plain backdrop. If the product is blue too, switch to a grey backdrop.
- Orange, used for the logo and buttons, is the complementary color to the blue backdrop, so it always pops in frame.
Checklist for every shoot
- Clean the lenses, check batteries and memory cards
- Turn the lights on 2 minutes early, plug in the LED bar, switch off other lights
- Lock white balance, focus and exposure on every camera
- Tighten the magic arm and give the GoPro a wiggle test
- Clap once at the start of each take to sync sound and picture in the edit
- Shoot in order: CAD screen → printer timelapse → hands at work → assembly and product on the backdrop
- Product shots: remove the mat, 10–15 seconds locked off plus a few slow slides
This setup will keep evolving with each video. The channel’s first machine, the 360° turntable, was built precisely to make angle 4 look better.